As a new Author, it can be somewhat intimidating to try to figure out how to self-publish your book.
I can totally relate to that feeling.
When I first starting writing, it was daunting enough to write my first book. Now I was supposed to figure out how to get this book edited, formatted and uploaded onto Amazon?
I remember feeling overwhelmed and just a little afraid of how I was going to learn to self-publish my book.
After a few days of stewing and worrying, I finally decided to talk to my hubby about these concerns and fears. In his usual common sense way, he talked me back from the edge of the cliff I’d been standing on(metaphorically speaking) and encouraged me to stick with it.
Read the rest of this blogpost below…
A Conversation that helped me begin…
As I talked with my hubby about my fears, he responded. I know you can do this. Let me ask you, how did you figure out how to write your first fiction book?
I thought about it for a minute before I replied. Well, I read a whole bunch of blogposts, listened to podcasts, watched YouTube videos and read books on the craft of writing. Then, I just started writing.
He nodded and sent me a knowing smile. Exactly. This is no different. You’re just learning another new skill. You can do this. Just begin.
In that moment I realized he was right. Just because it was something new and beyond my skill set at the time, didn’t mean I couldn’t learn how to format my book and self-publish it onto Amazon and other digital retailers(e.g. Kobo, iBooks, Google Play Books, Nook, etc.). I had learned other skills in the past, so why couldn’t I learn how to self-publish my books as well?
I realized I could do this. Even though it seemed intimidating, there had to be a way I could learn how to self-publish my books like thousands of other Indie Authors(self-published authors) were doing.
It seemed to me that I just needed to motivate myself and commit to the process of learning. Right then, I decided to take one hour every day to learn something new about how to self-publish my book.
As of this writing, I can happily say I’ve learned to format and self-publish several books. It was a little time consuming to learn at first, but not as difficult as I originally expected. Now, the whole process is quite enjoyable!
In this blogpost I will take you through these 9 steps to self-publish your book on Amazon. My hope is that after reading the steps below, you will feel empowered to self-publish your own book(s). 😉
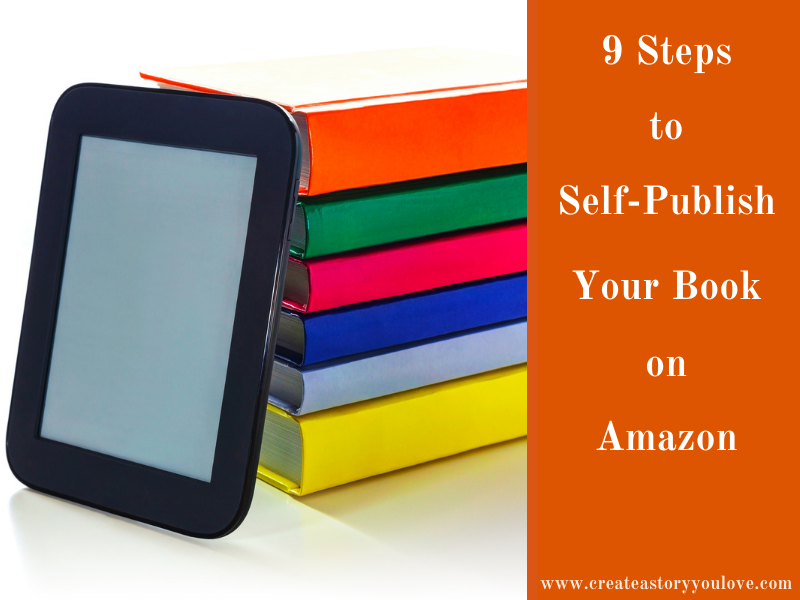
9 Steps to Self-Publish Your Book on Amazon
STEP 1: Set Up Your KDP Account
In order to sell your book on Amazon, you’ll need to setup a KDP(Kindle Direct Publishing) account. It’s simple. All you do is log-in to your Amazon account, or if you don’t have one create a new account.
To get it setup, you’ll need to fill out some personal details. These include details like adding a bank account and filling out a short list of questions re: your tax information. Once you have that filled out, you’ll be setup to receive those wonderful royalty payments. Head on over to Kindle Direct Publishing on Amazon to setup your account.
STEP 2: Write Down the Title of Your Book
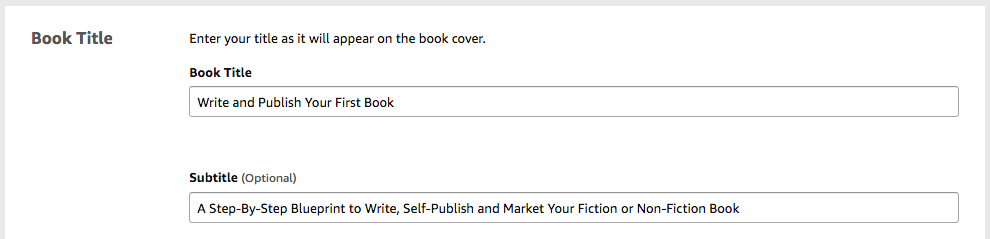
Welcome to your KDP dashboard. Once you’ve setup your information(see Step #1 above), you’ll see the dashboard has a section called “Book Title” and underneath that you’ll see a spot that says “Subtitle.”
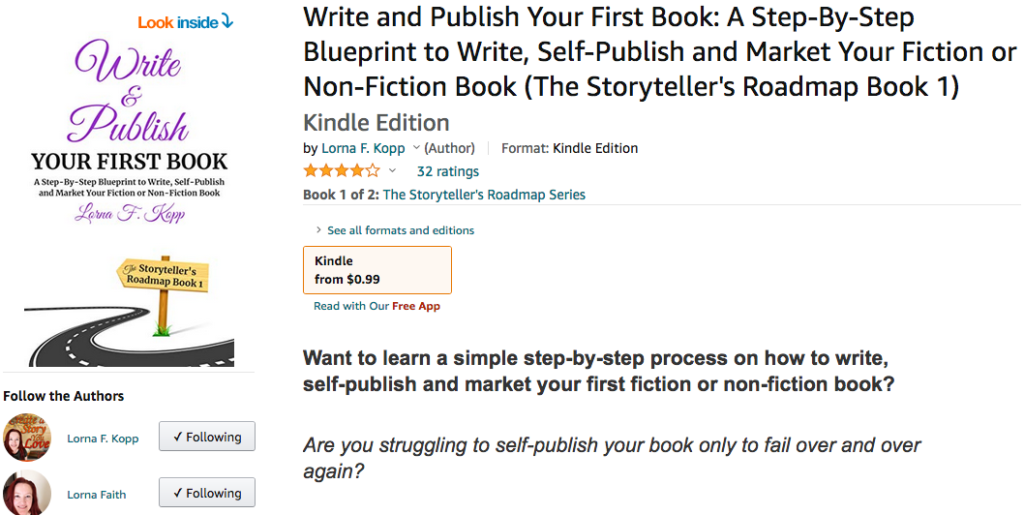
I’ve added a screenshot below of the KDP dashboard of my first non-fiction book: Write and Publish Your First Book. I hope by seeing my dashboard you’ll get a better idea of what to look for when you setup your own book information.
For this Blogpost tutorial, I’m only going to cover setting up an ebook. Maybe I’ll do another blogpost specifically on how to setup your Paperback book in the KDP dashboard(you could let me know in the comments if that would be something that would be helpful).
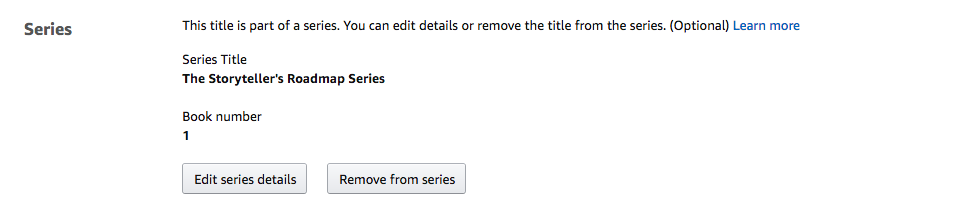
Under the “Book Title” information you’ll also see a place to add your Series name(if you’re writing a series). I’ve added a screenshot below.
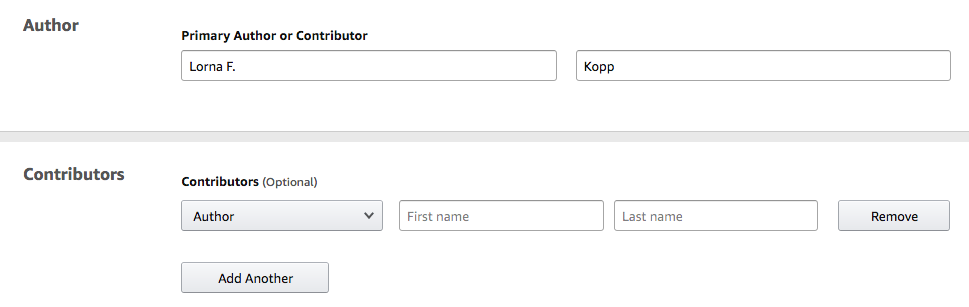
After you’ve added the details above, you’ll need to add your author name and add any additional contributors who worked on your book. For instance, if you hired an Illustrator for your book you’d add that in the section below. For myself, I didn’t hire an Illustrator so I didn’t add a contributor.
Once you’ve added all of your information above, the next step is to write your compelling book description!
STEP 3: Write A Description for Your Book
Think of the description you write for your book similar to what you would write on the back of a paperback book cover. It’s your book blurb that will hook or create curiosity in your potential reader. Once you have your book description written out, it’s time to use bold words and italics to dress up your description somewhat.
An easy way to add bold words or italicized words is by using Kindlepreneur’s book description generator. All you do is copy and paste your book description into the empty box where it says “write your description here” and add the italics and bold lettering you want to style your description.
When you’re satisfied, click on “Generate My Code” and you’ll see the html code you need to add to Amazon’s Description box on your dashboard, like the one below.
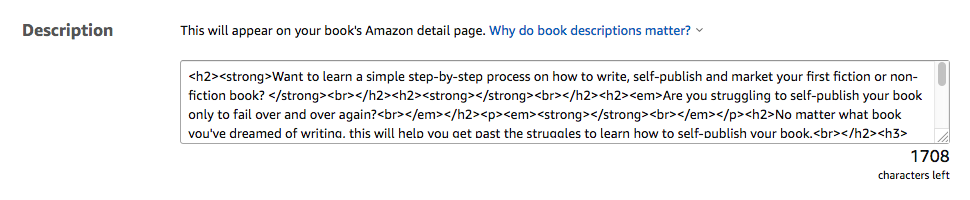
When I self-published Book #1 in this series, I added bold words and italics and tried to use keywords that would draw readers in. You can see by the screenshot below.
STEP 4: Set Up Your Book’s Categories and Keywords
It’s simple to setup your categories and keywords, once you’ve chosen which ones suit your book the best. Sometimes choosing keywords can be somewhat mind-numbing.
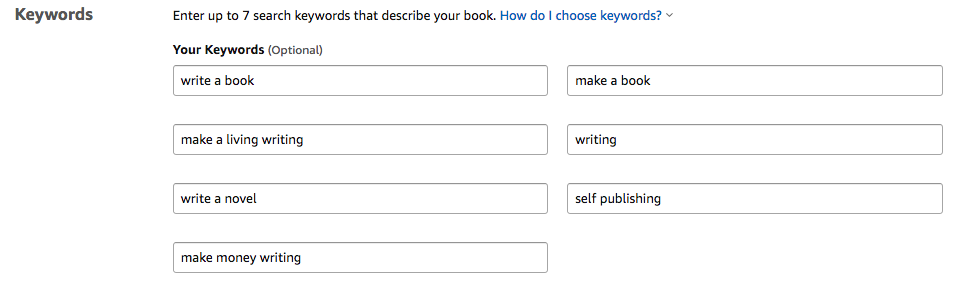
With a nonfiction book, most of the time it’s easier to pick keywords that will relate to your topic. For example, for my nonfiction book on writing and self-publishing, a few keywords(and keyword phrases) I chose were: write a book, make a book, make a living writing, writing, write a novel, make money writing and self-publishing.
I chose keywords that I thought would resonate well for readers who were looking to write and publish their first book. I added the screenshot below to give you an idea of what I mean.
Make your Keyword Search simple. I use Publisher Rocket to help me find keywords and categories to use when I self-publish my books. Learn more about Publisher Rocket here.
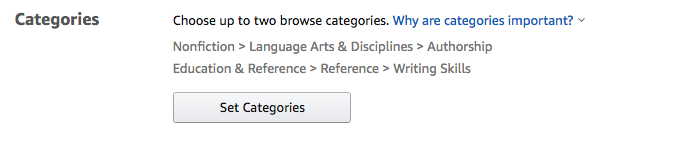
When you are ready to choose Categories, Amazon lets you choose two for your book. It’s very simple to enter them into the KDP dashboard. You can choose the categories you think fits you book best at the time of publishing, however it’s helpful to remember that you can change these later. So feel free to experiment. I’ve added a screenshot to the box where you choose categories on your dashboard below.
STEP 5: Upload a mobi file of your ebook.
This is the step where you’ll get to put your book into your KDP account!
When you get to the webpage where it says “Manuscript” that’s where you’ll upload you ebook file. Just a quick note: If you’re wondering how to produce a mobi file for your book, there are a few options to choose from. I’ve added two useful tools you can use to format and generate your ebook into a mobi file(as well as epub file). One option is a free tool by Draft2Digital. You can learn how to do that here.
For all my ebooks, I format them and generate a mobi file(and an epub and PDF file) of my manuscript with Vellum. I love this software and have used it for three years now with no issues. As of this writing, Vellum is made available for Mac computers, but if you have a PC computer and if you’d really like to try it out check out this article.
The fonts are beautiful and you can also add beautiful hearts or flowers on the first page of each chapter. I love looking at beautiful things so I got the full Publisher/Press version of this software. With Vellum you can create beautiful ebooks as well as print books. Learn more about Vellum here. (A quick note: This is an affiliate link and I earn a small commission if you choose to purchase this software. I only recommend software or services that I use and trust myself and I hope they are as useful to you as they have been for me).
Now that you have your book generated into a mobi file, you can click on the yellow button that says “Upload eBook Manuscript.” I’ve added a screenshot below to give you an idea of what that looks like.
When you’ve selected your manuscript file, you’ll get a popup note from Amazon that will let you know it’s processing your book. It’s important that you do not refresh your page or click off this page while you’re waiting. It always takes a few minutes to upload your book and verify it.
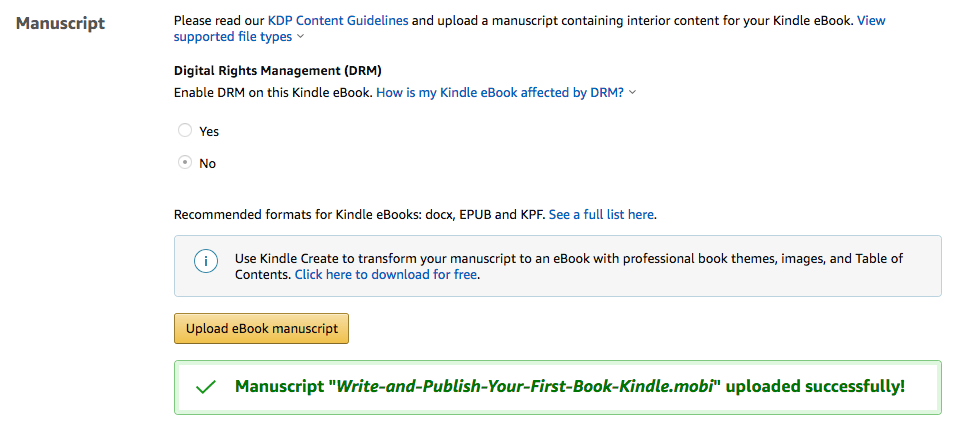
Once you’ve finished that, you should see a little green message popup that will let you know that you’ve uploaded your mobi file successfully. Yay! But wait, we’re not quite done. There are still a few important steps to go before we’re finished.
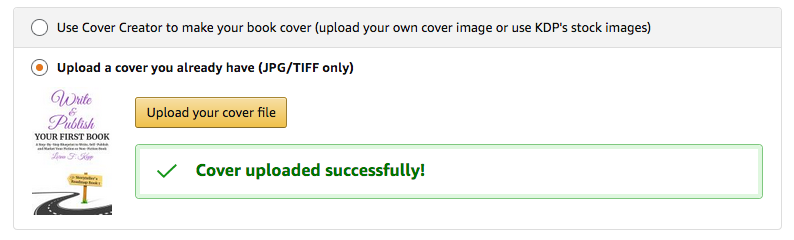
STEP 6: Upload a Book Cover for Your eBook.
You want an attractive cover for your book. Many book marketing experts say this is the first thing readers are attracted to when they view your book. If you can get a cover designer to create your book, that will go along ways to help you get the right feel for your book. There are a couple of cover designers with reasonable prices that I’ve used and highly recommend. Domi at inspiredcoverdesigns.com does a great job and so does Wilette at RedLeafbookdesign.com.
Ideal dimensions for your book cover on Amazon are 2,560 pixels in height and 1,600 pixels in width. Amazon accepts Tiff or JPEG file formats for your ebook cover. Read more about the specifics here.
When you have your book cover ready to go, you upload it on your KDP dashboard when you click the yellow button that says “Upload Your Cover File.” I’ve added a screenshot below.
After you’ve uploaded your eBook manuscript and book cover, you can use the “eBook Preview tool” to take a look at the inside of your file. I usually use this feature to double check that everything looks as it should inside my eBook.
Open up this preview feature to double check that everything is correct. A couple of details to look for: 1)that your book cover shows up correctly and 2)that the interior of your manuscript looks the way it’s supposed to. If you find anything that’s incorrect, go back and double check your files again and re-upload you mobi file or book cover file.

After you find everything has uploaded correctly, it’s onto the final few steps!
STEP 7: Set a Price for Your eBook Between $2.99 and $9.99
Of course you can set the price for your eBook at any price you’d like, however there are benefits to setting your price between $2.99 and $9.99. Amazon offers a 70% royalty rate on eBooks priced between $2.99 and $9.99. If the prices are lower or higher than that, you’ll receive a 35% royalty rate.
However, sometimes it might be beneficial to set your book price at $0.99. For example, if you are promoting book #1 in your fiction or nonfiction series, lowering the price of the first book really attracts new readers to your books which could lead them to read through your entire series.
When you set your price, Amazon calculates your estimated royalties. For each book, you’ll be deducted a small “delivery rate” based on the file size of your book and then it will show you how much you make per sale.
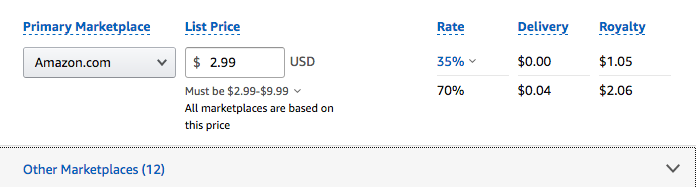
When I set the price of the book, I find it helps if you click on “other marketplaces” (see screenshot above), to manually set the prices for international sales. You’ll get far better results if you manually set the price for each country. For example, if you sell your book to AU(Australia) you can switch the price from $4.19 to $3.99, to make it look more attractive to readers.
STEP 8: Choose if You Want to Enroll Your Book in KDP Select
On the same webpage where you set up your price on your KDP Dashboard, you’ll be asked if you want to include your book KDP Select. This is a program for authors offered by Amazon where you can get paid not only from book sales but also from pages read. Your book needs to be exclusive to Amazon for 90 days if you choose to enroll in this program.
KDP Select offers two helpful benefits for self-published authors:
1.When your book is included in Kindle Unlimited, readers that have the Kindle Unlimited subscription will be able to add your book to their eReaders and read it. You as the author will get paid for how many pages have been read of your ebook.
2.When you enroll in this program, you are also given the ability to run free book promotions, and Kindle Countdown deals to help market your eBook.
Whether or not you choose to enroll your book in KDP Select most likely will depend on your goals for this book or book series. If you want your book available on Kobo, GooglePlayBook, Apple Books and Nook as well as on Amazon, you won’t want to enroll your book in KDP Select.
This is the path I’ve chosen with my nonfiction series for writers. However, I have chosen to enroll my pen name’s romance series in this program, because romance readers are avid and fast readers and many readers have a Kindle Unlimited subscription so they read through my books quickly.
Think about what your goals are for your book and then it’s a simple matter of checking(or not checking) the box where it says “Enroll my book in KDP Select.”

Also at the bottom of this webpage on your KDP Dashboard you’ll see an option to enroll your book in Kindle Book Lending. This program allows people to lend your book to other readers for 14 days. When you’re enrolled in KDP Select, this is a mandatory feature, but authors who sell their books at other digital retailers(Kobo, Apple Books, Google Play Books, etc) can choose if they want to participate.
It’s a great option for authors, and since word of mouth is the best marketing there is, this is another way to get some new loyal readers for your books.
STEP 9: Publish Your eBook
Finally, this is the moment you’ve been waiting for. 😉 Now that you’ve arrived at the finish line are ready to publish your eBook, I would recommend taking a few minutes to click back through the previous pages on your KDP Dashboard to double check that you’ve setup all the details for your eBook correctly.
You can correct a mistake after you’ve self-published your book, but it’s better if you can confirm that all your book information is fixed up how you want it, before you hit publish.
If you’re not quite ready to publish, there’s a “Save as Draft” button that allows you to come back and finish later. But, if everything looks great, then go ahead and hit the yellow “Publish Your Kindle eBook” button.

Amazon lets you know it can take from 24 to 72 hours to approve your eBook and make it available for sale. However, if you’ve followed the steps and double checked everything, the process can be much quicker. For example, when I self-published my first book, it took the full 72 hours for Amazon to approve it and make it available on their website. These days, I often will see my eBook available in the Kindle Store within 12 to 24 hours.
So that’s it. You can see the steps above are quite simple and not as scary as perhaps you first thought. Congratulations on self-publishing your book on Amazon!
I hope this has been helpful for you and your writing journey. If you have any questions, please do comment below and hopefully I can answer them or at least steer you in the right direction.
Happy writing and self-publishing 🙂