It’s important to have a platform of your own to share your message and draw more readers to what you have to say. The best and simplest way to do that is to start your own self-hosted blog with WordPress.
With over 400 million people looking at blogs each month, it’s an amazing opportunity. Isn’t it time you took a chance and started your own blog? It has never been easier – or simpler – to connect with an audience and get your message heard… but are you joining in the conversation?
We all have something to say. Blogs not only make that possible, they make it simple to do.

Imagine if you had the chance to share what you’re passionate about with the world… what would you say? And better yet, what would happen if people read your words, actually listened?
Isn’t it time you started your blog?
Only you can choose yourself, take a risk and figure out what it takes to get your message heard and to watch as your causes spreads from one person to another, to another…
What have you got to lose if you don’t do this? Probably nothing. You’ll continue to get what you’ve had before. You’ll stay unheard and invisible. If you’re okay with that, then keep doing what you’re doing.
But if not, then it’s time for change…
Writing and blogging has made me who I am and can lead to amazing opportunities
I remember when I first started blogging in January 2012. It felt scary and risky, putting my thoughts out there into the world.
Alongside blogging, I started journalling almost everyday. Something happened. I started to see myself in a new light, my ideas forming clearly and developing and shifting to a whole new level.
So I started experimenting with ideas and started discovering what I was passionate about and soon learned what I loved – writing stories and helping others do the same – and I also learned what I was “meh” about 😉
Writing is Powerful
A blog is the easiest way for publishing ideas on the Internet for many other readers to see. It helps you get those ideas that you have in head, into the world, which in turn helps you to develop your ideas further.
I started blogging for fun 4 years ago. I didn’t have a clue what I was doing, but just wanted to share my ideas and what I was passionate about. Over time, my writing and passions have developed and I was able to begin to narrow my focus and understand what I loved to write and talk about and the way I really wanted to help others.
As you continue the habit of writing, it’s a super way to learn how to communicate, process your thoughts and it also helps you stay accountable to big plans and life changes, to build an audience and to understand the essence of who you are and the value you bring to the world.
Simply put, daily writing is one of the most powerful habits I’ve started and continue to do. It’s changed my world…
When I first started, I thought it would be super technical to set up a self-hosted blog. Surprisingly, it’s really easy to do. I do believe it’s worth investing a little money to be able to have full control over your website. I’m going to share with you screenshots of exactly what you need to do.
Here’s simple steps on how to make your own self-hosted WordPress Website in less than 15 minutes
In the screenshots below, I share what I wish I would have known when I first started blogging years ago. Seriously, it would have saved me a bunch of time and struggle. So I hope these steps help you to start blogging sooner.
Just a note before we begin: In this free tutorial, I share my affiliate link to Bluehost, which is a company I use for my websites and that I highly recommend that makes this process simple and easy. If you click the link to buy, I get a commission at no extra cost to you. Please know I only recommend products I use and love, and offering affiliate links is one way I can keep this blog going. Thank you ahead of time for your support 🙂
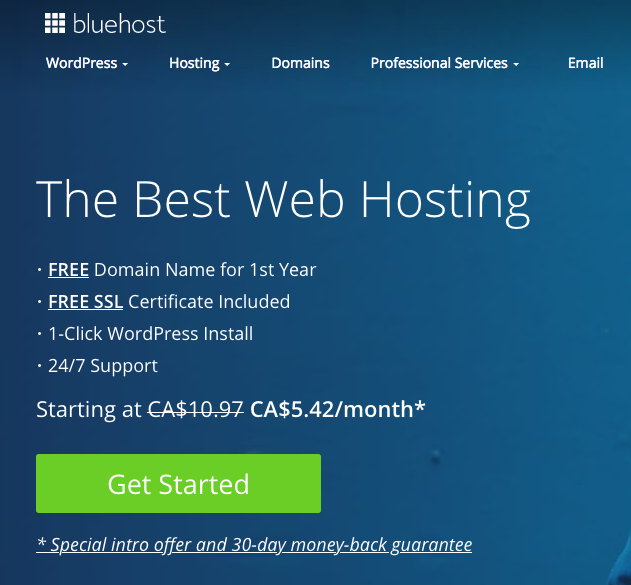
1. Click the green “Get Started Now” Button.
A web host, is where your website lives. You own it, but you pay a small fee to keep it online(sort of like paying property taxes to the government). In my experience, Bluehost gives you by far the best customer service and pricing of many of the hosting sites out there. They’ve also been a top recommended web host by WordPress since 2005.
I’ve set up screenshots to make this easy.
Click the green “Get Started” button below to begin.
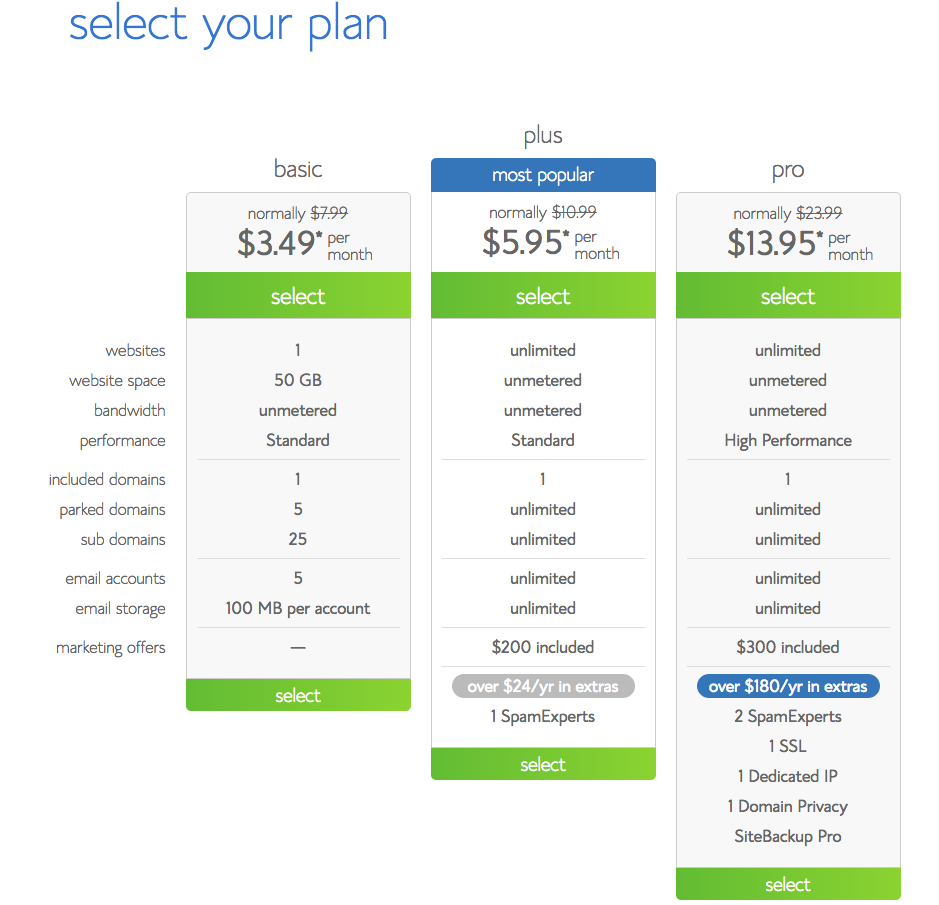
2. Purchase Your Hosting Package.
All you really need is the most basic option, which comes with a free domain(website address) of your choice. The only add-on you might want is Domain WHOIS Privacy, which keeps your personal information from being made public on your site. You don’t need any of the other add-ons or up-sells, such as Site Lock or Site Backup. All of those details can be sorted out much later. We want to keep this as simple as possible!
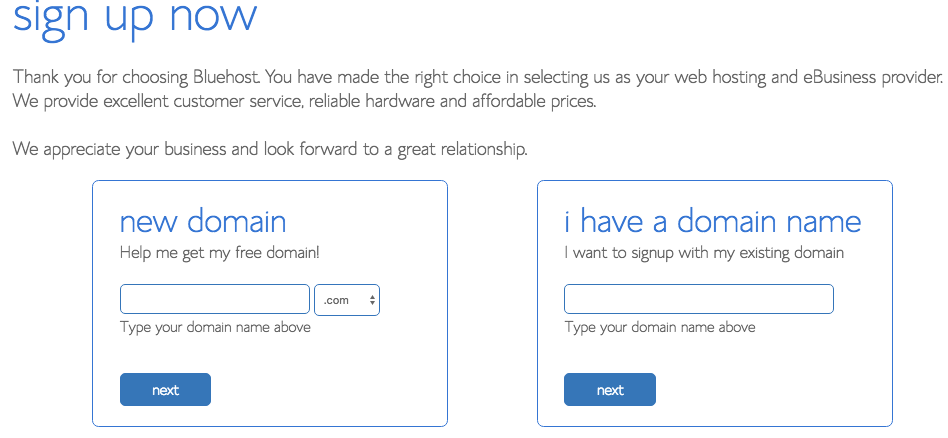
3. Pick your blog name(called URL or domain name).
This is part of the sign-up process with Bluehost. When you sign up for basic hosting, you get a website name for free.
I encourage you to keep it simple. Don’t put it off just because you can’t come up with a super amazing name. Using your first and last name(or something similar) works great… and might even be better if you don’t know what specific niche you’ll be focussing on. That way you’ll be able to blog about whatever topics you want to. Using your name can also allow the site to serve as a simple online resume… and it helps with your name’s google rankings 😉
On the next page enter the domain name that you’d like to use.
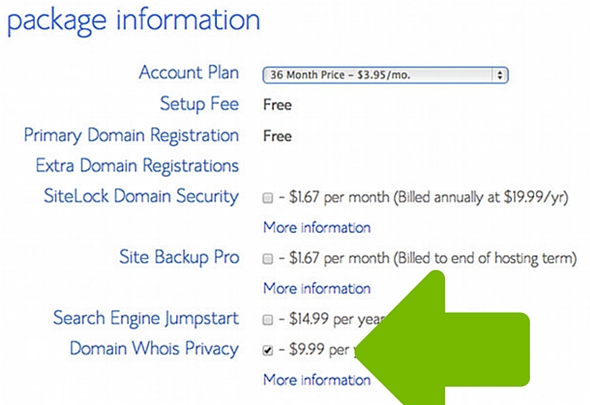
4. Fill out your contact details and payment information.
This part is easy. Just fill out the information – with your real details – so you can verify your account. In the screenshot below, you can see there’s extra options. I recommend you get the Domain Whois Privacy(to keep your contact details private), but don’t worry about the others.
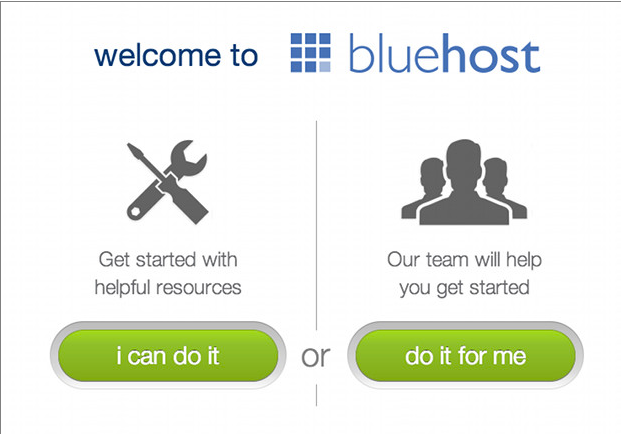
5. Choose “I can do it”… if you’re wanting to follow these simple steps and install WordPress by yourself.
Of course, you can also ask Bluehost to install your website for you for a fee. This is the message you’ll see when you are inside Bluehost and you first get access to your cPanel.
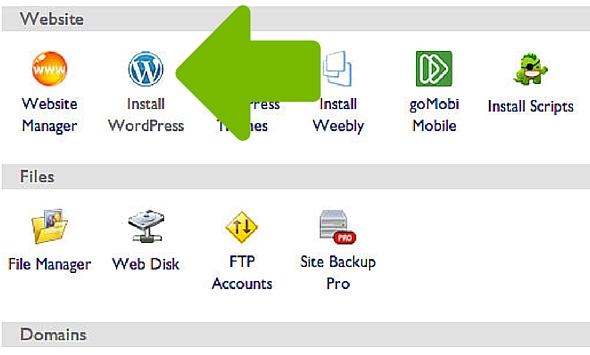
6. Scroll down and find the icon called “Install WordPress.”
Blogging requires software, and the best I’ve found is WordPress. It’s easy, quick and best of all, it’s free. You can set up WordPress through your host(Bluehost does this for you for Free). Otherwise, you can go to WordPress.org to download the software and upload it to a host. Just a side note: Using WordPress.org is different than signing up for a free blog at WordPress.com. This infographic explains in more detail.
Click on “Install WordPress.”
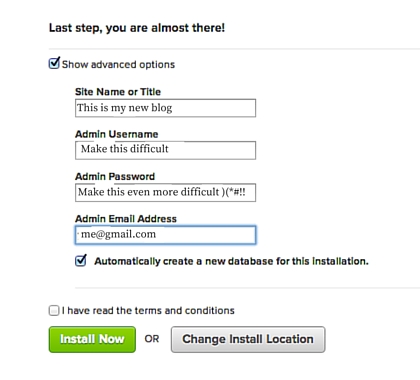
7. The next screen asks you to write the name of your new website and add a username, password and email address.
Just fill out the details – your website name, your new admin username, your password(make this difficult for hackers), and then add your email. Click that you would like bluehost to automatically create a new database for this installation and click that you have read the terms and conditions.
After you’ve filled out your details, click “install now.”
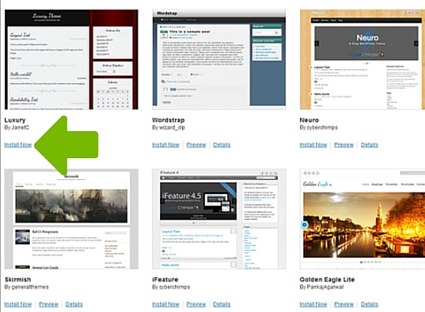
8. Choose a WordPress Theme.
When you first start using WordPress, you get access to many beautiful blog designs(called “themes”), and many of those themes are free. If you’re just getting started and you want a free theme, I recommend Twenty Sixteen. It has a simple and elegant design. If you’re wanting a little more of a unique design – like this blog I use Beautiful Pro theme – you can find other themes at Studio Press by clicking here.
You can change your theme by going to Appearances in the Left Hand sidebar of BlueHost, and click themes. Up on the top you’ll find a tab called Install Themes, click on that link. Once you are there, you can use the search function to find a theme you like – from the thousands that are listed.
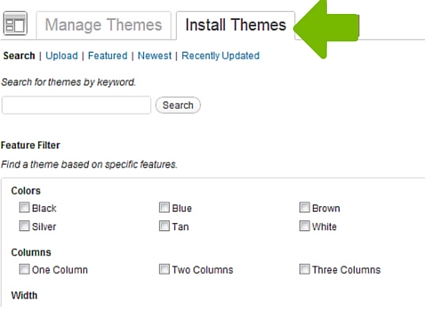
Or you can click install the theme design that you like best by clicking on install.
9. Log in and begin blogging.
Now you’re ready to begin to write on your own blog.
The URL for your dashboard(which redirects you to the login page if you’re not logged in) is yourblogname.com/wp-admin/. Once you are logged in, click “Posts” on the left hand side, and then choose “Add New.” Write a title and create some content for your new blog, and you’re ready to go!
That’s all there is to it. Now you’re blogging. This is really one of the best places where the difficult, but good work of writing begins.
What do you do if you already have a domain name?
If you already have a domain name registered with another service like Godaddy.com, but need a place to host it, there’s 2 things you can do:
1.Transfer the domain registration to Bluehost.
2.Change the name servers on your domain to point to your new host.
This video will show you how to do that:
If you’re ready to get started blogging with Bluehost, just click on the button below to get started 😉
They are a top recommended host by WordPress and have great customer service. I worked with them for a long time and have been very happy with the service.
If you want to share this with someone who would find it helpful, please do. 🙂
Do you have your own self-hosted blog? If you do, what do you love about it? If you don't, what questions do you have? Please share in the comments.